Monday, March 30, 2009

Mabel's New Shoes


We were lucky that the "as found" condition of Mabel included some degree of brakes. This was very helpful in rollong her on and off the trailer to get her home, as well as a test drive when we got her running. When we got around to pulling the wheels and having a look we found the braking we had was all in the rear. The front brakes were shot. Everything right down to the wheel bearings were in pretty sad condition.


The back brakes only needed a cleaning and some adjustment. We even have the E-brake working (to some extent). The fronts were a different matter. I ground off the rivets holding the drums to the hubs, and bought new hubs. I converted her wheel bearings from ball type bearings to modern tapered roller bearings, pressed in the outer races, packed and installed the inner bearing, and pressed in new grease seals.


I stripped off the old front brakes and backing plate. It was a good opportunity to clean and inspect the steering linkage, which was not bad. The fittings are now all taking grease. I cleaned all the hardware, including a paint job on the backing plates. It all went together nicely (minimal swearing) with new wheel cylinders, hoses, shoes, some springs & clips, drums, bearings and seals. Some new fluid and a bleeding and we have good pedal! Brakes are a GOOD thing.


I had the tires dismounted from the wheels. 3 out of the 4 were the original (drum brake style). The 4th was a more modern wheel capable of fitting in a disk brake. I found an original style wheel and a used tire in a boneyard for $20. The odd rim will become the spare. The four tires that came on the car are in pretty decent shape but no prize. They will do for now. I cleaned, polished, and painted the rims and will get the tires mounted and balanced as soon as the paint cures.


Sunday, March 8, 2009

Compression Test!

Did a dry compression test on all cylinders today. Here are the results:

-----Cylinder -------Test 1 (psi) ----------Test2 (psi)
-------- 1 --------------130 ------------------132
-------- 2 --------------130 ------------------130
-------- 3 --------------142 ------------------140
-------- 4 --------------128 ------------------125
-------- 5 --------------128 ------------------128
-------- 6 --------------130 ------------------128
-------- 7 --------------135 ------------------138
-------- 8 --------------135 ------------------132

The cylinders on this 283-in^3 V-8 (probably a 1958) are numbered 1-3-5-7 on the passenger side and 2-4-6-8 on the driver side. Those numberings are from front to back (I think.) So we actually tested them in the order 1-3-5-7-8-6-4-2. By the time we got to 6 the battery wasn't too happy any more, so the second test of the #6 cylinder actually read 120-psi. After a break with the charger on the battery, we ran test 2b and got the 128 above.

Speaking of the #6, the spark plug insert on that cylinder is a pain the ass, at least for getting our compression tester in. Between the heat shield for the exhaust manifold, and the steering box being right in there, the hose & adapter couldn't be lined up to the threads correctly. We had to take the adapter off the hose, screw it most of the way in first, reattach the hose, then screw both the rest of the way in. It took a little patience, but we got there. :)

Also had some transmission oil flow out the dipstick port while we were turning over the starter (there is no dipstick, we just had a towel jammed in there to keep it clean.) Not sure why it did that. Dad had drained & re-filled the transmission during the week, & used the recommended amount from the shop manual. But we don't have a dipstick yet to check the level, so I guess this is a sign that we put too much in. Dipstick is coming though; something like $40 or $50 for what amounts to a bent up coat hanger with a stopper on the end. XD

Anyway, these results are really good. Definitely what we were hoping to see. Compression out of the factory is supposed to be around 160-psi, and anything over 100-psi can be workable, so on a block as tired as this one 130 is pretty exceptional. The range on the readings is 17-psi, within the 20 pound rule-of-thumb for what to look for, and most are easily within 10-psi of their neighbors.

Carburetor Out

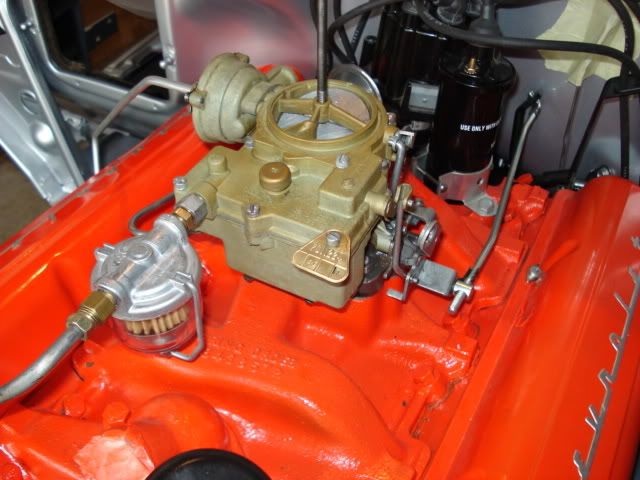
Took the carburetor out Saturday night. It was a pretty straight forward affair. All the nuts broke easy, and only one was hard to get at, being tucked in a recess behind the float bowl. Once I got it off, I was able to get a closer look at the body, to try and find ID markings and such. Rochester carburetors from that era came from the factory with a triangular tag under one of the float bowl screws. If that tag is gone (which ours is,) you basically have to go get access to GM's blueprints to figure out exactly what model you've got. This pic of a nicely restored '57 shows exactly what we're missing:


I did find a casting number on the base plate that read "GM195812," and I'd say it's a pretty safe bet that means it was made in 1958. That adds to my conviction that the engine we've got came out of a 1958 Chevy. The stamped number on the engine block reads "F0605D," and that D-suffix means it's a 283 from either a 1958 or a 1960. We might need to invest in a 1958 engine manual, since there are definitely some differences from what's described in the '57 literature, though mostly minor.

I've been reading up on the operation of these carbs, and I think one of the big contributions to our engine issues (tons of smoke, rough running, some knocking) is that the tube that connects the automatic choke contraption to the exhaust manifold is missing, and looks like it's been missing for a while. Without it, the thermostat coil in the choke doesn't heat up, so the choke valve doesn't open as intended. Basically we've been running at full choke, cold or not, which would explain why it acts like the mixture is rich. :)

Today I cleaned up the interface on the intake manifold, scraped off the old gasket, etc. Part of it still has a nice machined finish, but a section in the front is pitted out. The two front studs are also corroded & missing some threads at the bottom. Those will require some care. There was also a little damper/dashpot/god-knows-what attached to front left stud that looks like it was intended to be a part of the linkage system, but definitely wasn't doing anything useful recently. That thing was one of the reasons for the missing threads. Here's a pic of it, any speculation as to what it's for is welcome:

From Exhaust, Carb Out, & Wheel Checkout

Thursday, March 5, 2009

New Pipes

Put "Mabel" into an exhaust shop yesterday afternoon. At one point there was a full dual exhaust on that car, but it had seen better days. The passenger side was missing everything from a point upstream of the muffler, and what was left of the tube had been crushed mostly closed. The crossover tube was still there, a.k.a equalizer tube or "Y-tube" as they were calling it in the shop. So called (I think) because it attaches to a Y who's other ends are the coupling to the exhaust manifold, and the downstream exhaust tube. So it's right there.

As a result, a lot of exhaust from the passenger side manifold was being pushed back upstream, through the crossover tube, and out the driver side. But there was still plenty coming out the holes on that side. Not to mention that the crossover itself was almost completely rusted away at one point. Driver's side was in better shape. The muffler and tubing was mostly there, minus any tip on the end. There were some dings dents and holes, not to mention missing brackets, but at least it was there!

The shop we used was Beyond Repair in Everett. These guys are close to my house so we could drive her right there. If you're wondering why we decided to get new pipes put in so early in the process, our trip from home to the shop provides the best explanation I can give. I was upstairs when dad started her up (in the garage, which is downstairs.) She was so loud the whole house was literally rumbling, and the oak floor in my bedroom was vibrating my feet like a massage chair. When I got downstairs dad had already pulled out, but the cloud of smoke *in* the garage (thanks to the nonexistent tailpipes) was thick like fog. Rolling down the street not only are we getting a nice blue deaths-head of smoke out the back, but it comes out all four wheel wells too. Hilarious and awesome in it's own way, but not practical.

Beyond Repair turned out to be a great shop, and they do more than just exhaust. We'll probably be back in there now and again for work, or just to get advice. They were enthusiastic about working on this car, and they did great work. In and out, in a couple hours, and for a great price. Our thought going in was to put a pair of Flowmaster 50 series in there, or something similar, but the owner at BR happened to have a pair of old school Smitty glass-packs that were $80 a piece to the Flowmaster ~$130. I'm no expert, but a couple of the car guys coming through that shop were drawn to those Smitty mufflers sitting out like magnets. And when it was all said and done, the sounds was that nice mellow rumble we were looking for, so the risk ended up being worth it.

All new tubing, brackets etc., and a pair of chrome tips, courtesy of the shop, because all this car needs is more chrome. XD I've got pictures of the car up on the racks going in, but forgot the camera on the trip to pick her up. I'll try to grab a couple from underneath some time soon & get the whole set posted.

Sunday, March 1, 2009

First Weekend

New picture albums up (in the "Pics" link to left.) Video of an engine start now on youtube. We're in business!

This weekend we retrieved the Car from Lopez Island. Loading onto the trailer turned out to be cake. Sam (my dog) took his first ride in it while we pushed it down the gentle slope of the road and onto the trailer ramps. We stopped off to give her a bath and managed to plug up the drain with all the years of crap that had accumulated on/in this car. The paint's looking a bit more "Adobe Beige" and less "Lopez Mold" afterwards.

Getting her off the trailer was a bit more of trick. My garage is behind the house, down a steep & narrow driveway. We decided we'd get the trailer aligned then coast down the rest of the way and onto my back patio, which is sheltered by my deck. The goal was to get her running out there, at which point she could go into the garage under her own power. We're lucky she's came with strong brakes, that made the whole thing about as easy as could be.

2 new spark plug wires, 1 new fuel filter, 2 ft of fuel hose, 1 new battery, about 3 cans worth of WD40 and some starter fluid down the carb and she turned over like she'd never even stopped running. =D The exhaust isn't all there so she shakes every window with a three mile radius, and that's just sitting at idle! Not bad for one days work.

Sunday we started tackling some of the many, many, many things this car will eventually need done. Lots of WD40, penetrating oil, vinyl cleaner, & elbow grease involved here. We took a long look at the electrical system; currently the generator isn't hooked up at all, and the voltage regulator has wires where there probably shouldn't be. So the battery gets its charge from the house mains for now.

After a morning of poking, prodding, and scrubbing, we decided it was time for some more test. Fired right back up, drove back and forth on the patio no problem, so Sam and I piled into the passenger seats and up that hill we went, roaring and smoking and having damn good time! =D Imagine this old beater of a '57 Chevy coming growling down your street with no hood on it, blowing smoke and making so much beautiful noise you could hear her coming long before you ever saw it. We got a lot of smiles and waves and looks of "what the fu...?"

Back at home we pulled right into the garage where she'll be living from now on. Now the real work begins. :)